
To analyse firmwares or apps from different architectures on your Linux PC, you have to use emulator to run them.
Here I introduce QEMU to you.
QEMU
QEMU is a generic and open source machine emulator and virtualizer.
QEMU has two operating modes:
Full system emulation
In this mode, QEMU emulates a full system (for example a PC), including a processor and various peripherals. It can be used to launch different Operating Systems without rebooting the PC or to debug system code.User mode emulation (Linux host only)
In this mode, QEMU can launch Linux processes compiled for one CPU on another CPU. For example, it can be used to launch Wine or to ease cross-compilation and cross-debugging.
Installation
Full system emulation:
1 | $ apt install qemu-system # install many qemu's platform emulators |
User mode emulation:
1 | $ apt install qemu-user # to run apps with dynamic linked libs |
Create Virtual Disk
It prepares for installation of virtual machine.
1 | $ qemu-img create -f qcow2 OS.img 20G |
Install/Run Virtual Machine
To install virtual machine
1 | $ qemu-system-x86_64 -boot d -cdrom ubuntu-16.04-desktop-amd64.iso -hda OS.img -m 2048 -bios OVMF.fd |
To accelerate (use kvm)
1 | $ apt install qemu-kvm |
To run virtual machine
1 | $ qemu-system-mips -M malta -nographic -no-reboot -kernel "zImage-mips" -hda "image-mips.ext2" -append "root=/dev/hda rw init=/usr/sbin/init.sh panic=1 PATH=/usr/bin console=ttyS0" -net nic -net tap -drive file=/tmp/share.img |
Other examples:
1 | $ qemu-system-mipsel -kernel openwrt-malta-le-vmlinux-initramfs.elf -M malta -drive file=/tmp/share.img -net nic -net tap -nographic |
Note: images and kernel modules can be found Here, in which the README.txt provides QEMU using scripts.
Debug Programs
Since QEMU implements gdbserver, dynamic analysis can be performed by adding -g and gdb attach to it.
First install necessary libs. Take ARM as example.
1 | $ apt install -y gcc-arm-linux-gnueabi #32-bit |
Here we have:
64-bit:gcc-aarch64-linux-gnu g++-aarch64-linux-gnu
32-bit:gcc-arm-linux-gnueabi gcc-arm-linux-gnueabihf g++-arm-linux-gnueabi g++-arm-linux-gnueabihf
Let’s distinguish the two:
gcc-arm-linux-gnueabi– The GNU C compiler forarmelarchitecturegcc-arm-linux-gnueabihf– The GNU C compiler forarmhfarchitecture
The only difference is, they means differnet value of ‘-mfloat-abi’ option of gccThere are 3 values to choose for ‘-mfloat-abi’:
- soft: do float caculation without
fpu(floating-point unit), but using software method. - softfp: default method that
armelarch uses (default valuegcc-arm-linux-gnueabiuses), which means usingfputo calculate, but save arguments in general registors. - hard: default method that
armhfarch uses (default valuegcc-arm-linux-gnueabihfuses), which means usingfputo calculate, and save arguments infpuregistors.
- soft: do float caculation without
Let’s distinguish
gccandg++
GCC: GNU Compiler Collection, Referrers to all the different languages that are supported by the GNU compiler.gcc: GNU C Compilerg++: GNU C++ CompilerThe main differences:
gccwill compile: .c/.cpp files as C and C++ respectively.g++will compile: .c/.cpp files but they will all be treated as C++ files.
Also if you useg++to link the object files it automatically links in the std C++ libraries (gccdoes not do this).gcccompiling C files has less predefined macros.gcccompiling .cpp and g++ compiling *.c/.cpp files has a few extra macros.
Run apps with dynamic libs
1 | $ qemu-arm -L /usr/arm-linux-gnueabi ./filename #32-bit |
Install gdb
1 | $ apt install git gdb gdb-multiarch |
Debug 32-bit apps
1 | # term window 1 |
Debug 64-bit apps
1 | # term window 1 |
Network Configuration
QEMU provides 4 network communication methods, which are:
- User mode stack: to implement a protocol stack in the QEMU process. Work like NAT server.
- Socket: Create a socket for a VLAN and connect multiple VLANs together.
- TAP / bridge: The most important communication method, we need to use this method if we want to apply QEMU virtual machine’s external communication.
- VDE: also used for connecting VLAN
TAP mode works like VMWare’s network bridge.
Essentially implements network card virtually (not physically)
Software Preparations
1 | $ apt-get install bridge-utils # virtual bridge utils |
Build a network bridge
At first your network is: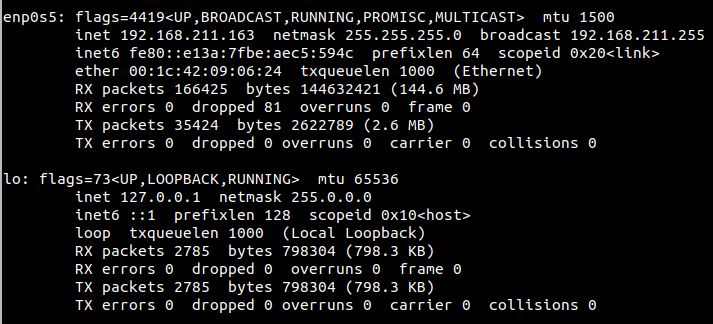
Build the bridge
1 | $ ifconfig your-net-int down # stop network interface |
Type ifconfig to see result: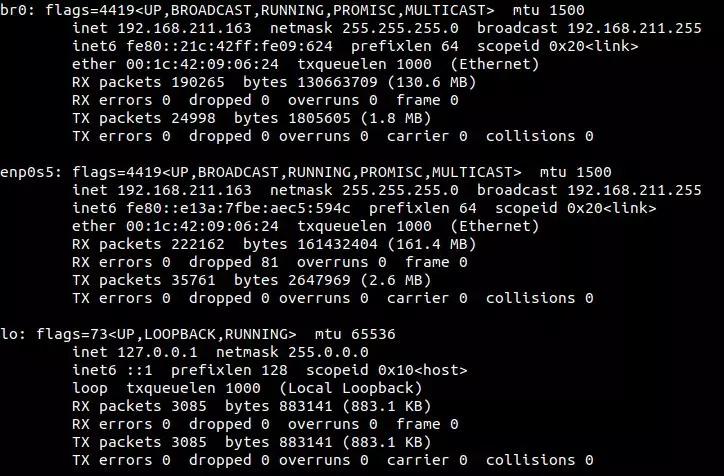
The brief picture of network (bridge and internet):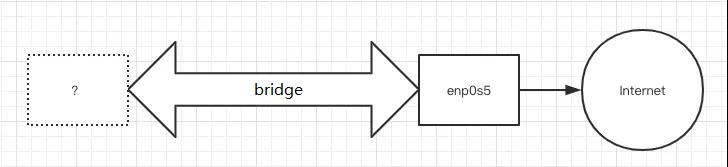
Create a TAP device
Create a TAP device to be an interface on the bridge, which QEMU can use
1 | $ tunctl -t tap0 -u root # create a tap0 interface, only accessed by root |
Type ifconfig to see result: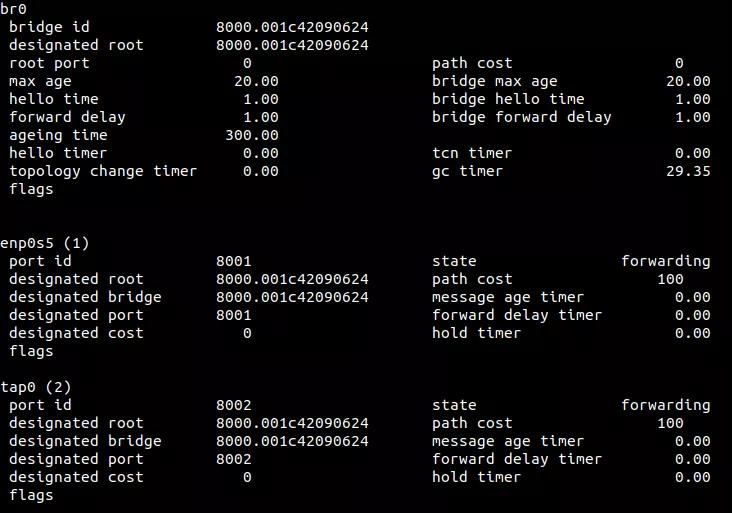
Now the picture of network (bridge and internet)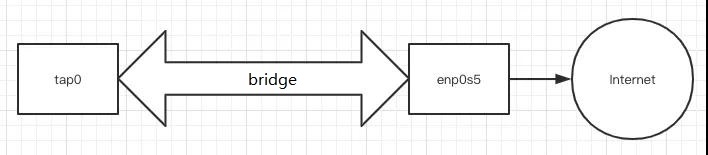
Well, if other device or interface is needed…
Existence of more than 2 interfaces is permitted in the bridge: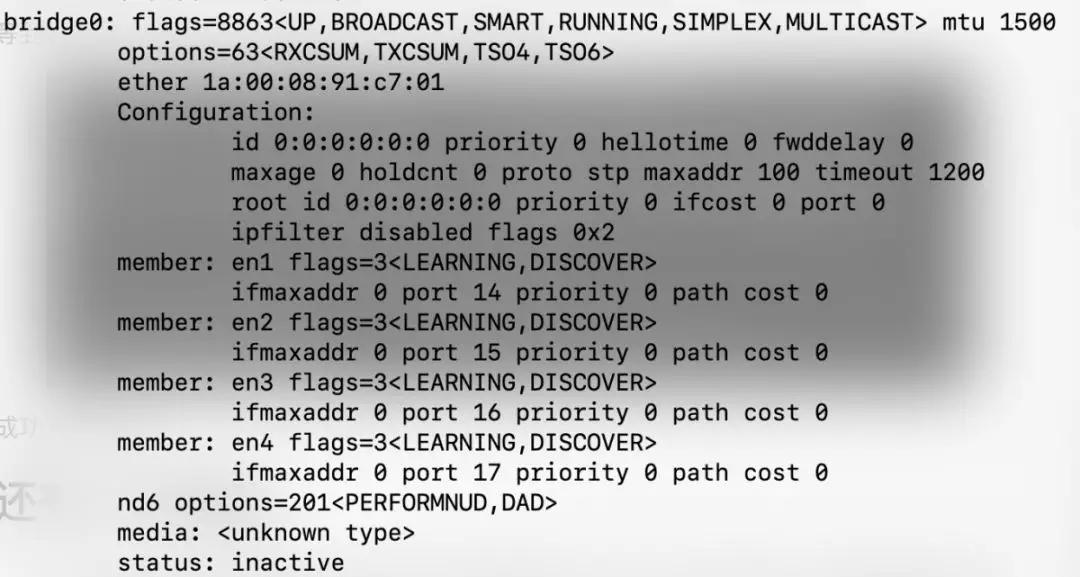
Connect QEMU to tap0
Now we just need to connect QEMU vm to tap0
1 | $ sudo qemu-system-mipsel -M malta -kernel vmlinux-3.2.0-4-4kc-malta -hda debian_squeeze_mipsel_standard.qcow2 -append "root=/dev/sda1 console=tty0" -nographic -net nic -net tap,ifname=tap0,script=no,downscript=no |
Finally we get vm connected to internet
But the problems are:
- sometimes, under special circumstances, QEMU cannot connect to internet. type
ifconfigto check network configuration, and usedhclient br0to get dhcp ip again. - All commands above used by
root, so remember to addsudo. - Once you reboot, all configs disappear. Write a script please.
Another Method
Edit /etc/network/interfaces
1 | auto lo |
Edit /etc/qemu-ifup
1 | #!/bin/sh |
Then
1 | $ chmod a+x /etc/qemu-ifup |
Restart network
1 | $ /etc/init.d/networking restart |
In this way, there is no need to configure next time you boot up.
Method for WSL users
If you use WSL(Windows Subsystem for Linux), the above network modifying is not recommended, because
1 | # on WSL 1 Ubuntu we failed to add devices |
Well, it doesn’t mean this method works on WSL 2. If continue, we have to disable ethx and enable br0 to get ip byDHCP.
This step is dangerous since br0 cannot receive a valid ip via DHCP and your ethx may not be fine as well.
But We can use available bridge device that docker provides us with – docker0.
On WSL 2 we can use docker (WSL 1 not supporting), though systemctl not
1 | $ apt install docker.io |
And the bridge docker0 is assigned a ip: 172.17.10.1
1 | $ ifconfig -a |
Then we add a TAP device tap0 and connect it with docker0
1 | $ tunctl -t tap0 |
When starting QEMU we add -net nic -net tap,ifname=tap0,script=no,downscript=no at the tail.
On QEMU guest we configure ip and gateway and dns
1 | $ ifconfig eth0 172.17.10.xxx/24 |
Then the network configuration is finished.
But when using docker virtual machines, conflicts may occur, so you can add "bip": "x.x.x.x/24" to /etc/docker/daemon.json to assign new ip for docker0.