
It’s not too late to learn fuzzing which is booming in this age.
Fuzzing Intro
When performing software vulnerability mining or discovery, there are several technical methods includes: static analysis, dynamic analysis, symbolic execution and fuzzing.
- Static Analysis:
Through its analysis of various syntax, semantics, data flow, etc., to carry out vulnerability discovery. - Dynamic Analysis:
Step by step analysis of program execution. Normal way to track program’s action is to debug. - Symbolic Execution:
Try to find out what input corresponds to what kind of running state, to cover all execution paths. - Fuzzing:
Use a large amount of input data to automatically execute the program, so as to find out which inputs can make the program abnormal, and then analyze possible vulnerabilities.
As for fuzzing, there’re still several types of it:
- Generation Based: generate test cases from scratch
- Mutation Based: mutated from existing data samples based on some rules
- Evolutionary: Contains both of the above, and mutates based on feedback from code coverage.
Brief History
Not so brief, check it in A Brief History of Fuzzing
Fuzzing Process
Take AFL as an example.
(Remember it’s a model only for afl-fuzz, not for every fuzzer)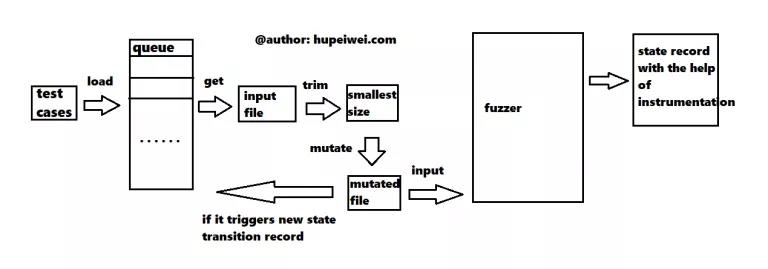
Do source code instrumentation before compilation, to record code coverage.
The debugger provides some input for the program, the leftmost testcases, which are put into a queue after the AFL is loaded.
For each iteration, AFL first takes a testcase from the queue, and then trims it to remove unnecessary data to improve the operation efficiency.
Then it performs mutation operations on the input. There are many modes of mutation, which can generate many new testcases.
Send these newly generated inputs to the target program to run. If it can generate a new execution path or cause the program to crash, put it in the queue.
Throughout the process, every program crash is recorded, which may represent a hidden vulnerability.
Fuzzing Technical Points
Input data
Because the input data is used to automatically execute the program, it is obvious that the generation of data will greatly affect the efficiency.
- If the input format of the target program is a pdf file, then files that do not meet the format will be difficult to enter the target program for running tests.
- Even if the data meets the input requirements, maybe data A and data B trigger the same execution path, so running both A and B is a waste of resources.
- For individual data A, maybe only a small part of it really controls the execution path, then trims for rest parts are a waste of resources.
Mutation operation
The data given by the user is limited, but a lot of data is required to perform the fuzz test, so the fuzzer will generate new data based on the data given by the user. This process is called a mutation operation.
- So what mutation operators to define in the mutation process (choose what operations to change the original input data)?
- Which one to choose when facing multiple mutation operators in one mutation?
- Which input data can be used for mutation?
Increase coverage
The essence of Fuzz is to use the input to detect whether the execution path corresponding to the current input will generate a possible vulnerability. Therefore, if more paths are covered, it means that more vulnerabilities may be detected. Increasing coverage is more like a fundamental issue. The solution to the first two issues is actually improving coverage.
AFL
“American fuzzy lop is a security-oriented fuzzer that employs a novel type of compile-time
instrumentation and genetic algorithms to automatically discover clean, interesting test cases
that trigger new internal states in the targeted binary.
This substantially improves the functional coverage for the fuzzed code. The compact synthesized
corpora produced by the tool are also useful for seeding other, more labor- or resource-intensive
testing regimes down the road.”
Ok nice … but what does this actually mean? (even native speakers are confused)
Binary Instrumentation
The first component of AFL is a wrapper for GCC/CLang compilers that will inject during compilation its own assembly code into the target software.
The fuzzer will use this code to trace execution paths while feeding the system with new inputs and to determine if a new mutation of the input is able to trigger known or unkown (new) execution paths.
In compliation, we get the binary program from the source code. First turn source code to assembly code, then from assembly code to machine code.gcc (specifically the gcc compiler) is able to turn source code into assembly code, while as (also part of the GNU compiler suite) turns assembly code into machine code.
afl-gcc is a wrapper for the gcc compiler. It calls the gcc compiler for compilation on the one hand, and specifies afl-as instead of as for assembly. afl-as is also a package of as. It analyzes the assembly code and performs instrumentation on the one hand, and calls as to change the assembly code after instrumentation to machine code.
If you can’t/don’t want to recompile the source code of the target program, AFL also supports a QEMU mode, an extension that leverages the QEMU “user emulation” mode and allows callers to obtain instrumentation output for black-box, closed-source binaries. This mechanism can be then used by afl-fuzz to stress-test targets that couldn’t be built with afl-gcc.
Installation
Download the latest version of the source code (older releases), extract it and do the usual:
1 | $ make |
You have to set CPU to performance mode so that afl-fuzz can normally run.
Install CPU frequency management software and set
1 | $ apt install cpufrequtils |
Edit default mode so it won’t get back after reboot (not necessary)
1 | $ apt install sysfsutils |
Then it will be performance mode after next boot up.
Run an Example ( Reference )
A relatively simple choice to fuzz is binutils (including readelf, objdump, etc.).
Finish binary instrumentation:
1 | $ ./configure CC="afl-gcc" CXX="afl-g++" |
The following command will instruct the system to output coredumps as files instead of sending them to a specific crash handler app
1 | $ echo core > /proc/sys/kernel/core_pattern |
Create an input folder to put ELF file, which AFL will use as a base template.
Create an output folder for fuzzer to store its state and all the generated samples that make the application crash or hang.
This time we give /bin/sh a chance.
1 | $ mkdir afl_in afl_out |
Run the fuzzer
1 | $ afl-fuzz -i afl_in -o afl_out ./binutils/objdump -d @@ |
And we see
1 | ... |
In the afl_out/crashes folder you will find the files that made objdump crash, and you can run crash samples to see what happens.
Corpus Distillation
After finding input samples, we have to trim them to make them efficient and smaller size.
AFL provides two utils for us to do so: afl-cmin and afl-tmin.
(1) Remove files that executes same code – afl-cmin
afl-cmin aims to find the smallest subset with the same coverage as the full corpus.
For example: Suppose there are multiple files that all cover the same code, then the extra files are discarded.
It is used as follows:
1 | $ afl-cmin -i input_dir -o output_dir -- /path/to/tested/program [params] |
(2) Reduce size of single input file – afl-tmin
After decreasing of overall size, use afl-tmin to reduce single file’s size.
It has similar usage to afl-cmin, but still has two another working mode: instrumented mode (default) and crash mode (get rid of files causing abnormal exit.).
It is used as follows:
1 | # instrumentation mode |
Batch processing with a simple shell script
1 | $ for i in *; do afl-tmin -i $i -o tmin-$i -- /path/to/tested/program [params] @@; done; |
Perform Instrumentation
Normal Mode
Replace gcc and g++ with afl-gcc and afl-g++ in Makefile
or
If built by autoconf, use
1 | $ ./configure CC="afl-gcc" CXX="afl-g++" |
To load shared lib instrumented by AFL, complie statically
1 | $ ./configure --disable-shared CC="afl-gcc" CXX="afl-g++"` |
LLVM Mode
Under LLVM mode, you’ll obtain higher speed of fuzzing.
Not the newest but lower version (like 3.x.x) of clang and llvm are needed
1 | $ cd llvm_mode |
Then use
1 | $ ./configure --disable-shared CC="afl-clang-fast" CXX="afl-clang-fast++" |
Start Fuzzing
Fuzzing Mode
Generally afl-fuzz provides 4 fuzzing modes that differ in how the program execution between different fuzzing inputs behaves:
Dumb modethat just executes the program by doingfork()andexecv(). This is the slowest mode that does not rely on any fancy tricks to speed up program execution and also does not provide any insights how the program behaves with different inputs.- Basic
fork server modewhere the fuzzed binary does all the initialization steps that happen before calling themain()function and then program is repeatedly forked from that point on. This also includes instrumentation that is compiled in to the program so there already is some insight on what is happening inside the program when a specific input is processed. There existsQEMUmode forafl-fuzzthat technically enables fork server mode for uninstrumented binaries, but with some performance penalty. Deferred instrumentationthat works in similar fashion as the basic fork server mode. Instead forking just before callingmain()function, this enables to move the fork point further down the line and enables heavy program initialization steps to be avoided if they can be executed independently of the input.Persistent modewhere the fuzzable part of the program is repeatedly executed without resetting the program memory every time the program is called. This only works in practice if the program does not have a modifiable global state that can not be reset to the previous state.
afl-fuzz generates new inputs and analyzes the program execution results roughly at the same speed regardless of the mode. So these modes are in the order of efficiency in a sense that how much overhead there is for fuzzing one input. They are also in the order of complexity on how easy they are to integrate into an existing program that has not been made to be fuzzed. Especially as the fastest modes require clang to be available as a compiler and the fuzzable program needs to be able to be compiled and linked with it.
White Box Testing
(1) Test instrumented program
After compilation, use afl-showmap to run a test ( track execution path ) and see whether instrumentation is useful.
It prints output and captured tuples, which is for getting branch information
1 | $ afl-showmap -o output_dir /path/to/tested/program [params] |
(2) Run fuzzer
We have mentioned before:
1 | $ afl-fuzz -i testcase_dir -o findings_dir /path/to/program [params] |
(3) Use screen
1 | $ screen -S fuzzer1 |
Black Box Testing
Without source code, instrumentation won’t be finished.
It’s time for QEMU mode, which you should compile first as LLVM mode does.
Nevertheless, AFL’s QEMU version is also old enough, so follow the lead please
1 | $ apt-get install libini-config-dev libtool-bin automake bison libglib2.0-dev -y |
Start QEMU mode fuzzing
1 | $ afl-fuzz -Q -i testcase_dir -o findings_dir /path/to/program [params] @@ |
Parallel Testing
(1) Sole-system parallel testing
In theory, you can run fuzzing instance according to your computer’s core number, since one one instance is bound to one corresponding core.
Check core number in this way:
1 | $ cat /proc/cpuinfo| grep "cpu cores"| uniq |
Use afl-fuzz to do parallel fuzzing, you have to use -M parameter to assign a Master Fuzzer, use -S to assign multiple Slave Fuzzer
1 | $ screen afl-fuzz -i testcases/ -o sync_dir/ -M fuzzer1 -- ./program |
These two kinds have different fuzzing strategies.Master Fuzzer does deterministic testing – special rather than random mutations are performed on input files.Slave Fuzzer performs completely random mutations.
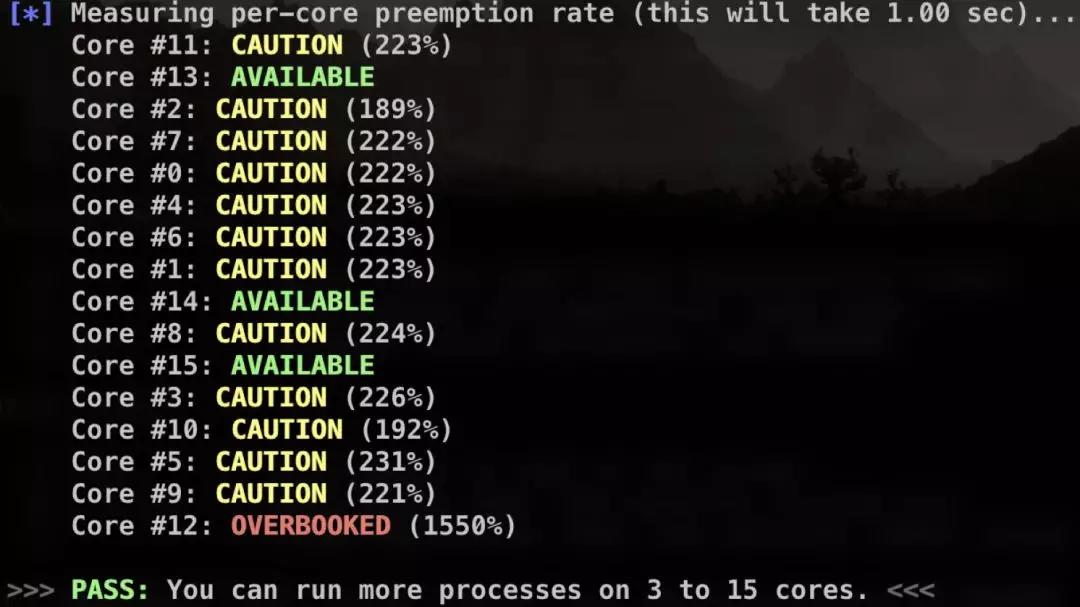
afl-gotcpu helps checking status of every core.
(2) Multi-system parallel testing
I Bet I’ll Hardly Use This. See You Next Time.